Thursday, December 13, 2012

Restore or Reset an AutoCAD CUI File

It is no wonder the most popular AutoCAD command is UNDO. UNDO might be the most popular action in all other areas of our lives if we had the option. I would much rather click UNDO after my toddler tips over a glass of milk at dinner than to go through the effort of cleaning it up. UNDO would also come in handy when our new puppy pees on the carpet. Even though we do not have an UNDO button in real life we can appreciate that we do in AutoCAD. So, what about when working with the AutoCAD CUI file? Good news! There is also an UNDO (sort of)...

When AutoCAD is installed on a computer the out of the box Support folder which includes the ACAD.CUIx file is tucked away on the C:\ drive. When AutoCAD is launched for the first time it configures the software for the currently logged in user. Part of this configuration process is copying the contents of the Support folder to the user's appdata\roaming\autodesk\...\support folder. If a different user logs on to the computer the same process happens so each user has his/her own Support folder and therefore, his/her own ACAD.CUIx file.

As changes are made to the ACAD.CUIx file it is possible for the CUI to become corrupt. It is sometimes difficult to detect when a CUI file has become corrupt but several unexpected errors can be resolved by replacing the CUI file with either a previous version or the original ACAD.CUIx file.

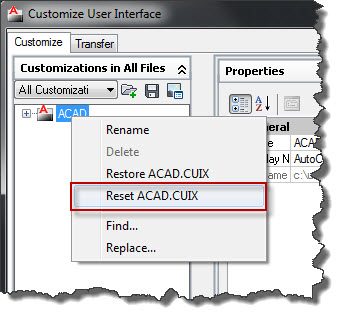
There are two choices available: Restore the CUI file, or Reset the CUI file. Restoring the CUI file is basically an UNDO and any changes that were made since the CUI Editor was opened are lost. Resetting the CUI file replaces the current CUI file with the original ACAD.CUIx file from the AutoCAD Install Location. So any changes that have ever been made to the CUI file are lost.

To Restore the ACAD.CUIx:
Open the CUI dialog (Manage tab | CUI). You will see the ACAD.CUI file and can confirm the location is in your users folder.


Right click on the ACAD.CUI and select Restore ACAD.CUIX


This option is nice if you have customizations that you want to keep and just want to UNDO the current modifications to the ACAD.CUIx file. Notice the CUI file will be restored to the state it was in prior to the CUI Editor being opened.


If the ACAD.CUIx file seems corrupt and you want to start all over with the original ACAD.CUIx file then you would choose the Reset option:

Open the CUI dialog (Manage tab | CUI), right click on the ACAD.CUI and select Reset ACAD.CUIX
This option will lose any changes made to the ACAD.CUIx file and will restore from the original out of the box version.
 
 
Resetting the CUI is also a way to clean out all partially loaded CUI files that might be in place from working with AutoCAD vertical applications. Additionally, it is important to note that Workspaces are saved within CUI files so depending on which CUI file custom Workspaces have been created in those will be lost as well.
 
Any time strange errors seem to be occurring consider the CUI as an option. I have seen several Fatal Errors when AutoCAD is starting up be resolved by Restoring or Resetting the CUI.


Sunday, August 26, 2012

Custom acad.lsp and acaddoc.lsp

We have talked about several methods to load custom content in previous posts. One of my favorites is loading an enterprise cui which in turn will load an mnl file with the same file name. This is a clean method and keeps all of your custom content organized and easily deployed from a central network location. However, there may be times when you really do not have a user interface (cui) and you just want your custom routine(s) to be loaded. There is a handy built in AutoCAD method for this, the acad.lsp and the acaddoc.lsp.

The acad.lsp is a special routine recognized by AutoCAD and is loaded every time an AutoCAD session is launched. The acaddoc.lsp is a special routine recognized by AutoCAD and is loaded every time an AutoCAD drawing is opened.

We can take advantage of these auto-loading routines to load custom content by placing files named either acad.lsp or acaddoc.lsp in any of our support paths defined by our network based profile. Creating separate (custom) acad.lsp and/or acaddoc.lsp files does not interfere with the delivered AutoCAD files (they just need to be in different folders).

For example, in our AutoCAD profile we have a support path defined (C:\sld):

This could of course be any network path. Let's place a custom acaddoc.lsp file that loads some custom content in this folder.

Now when AutoCAD is launched in a profile where our above path is a support path our custom lisp content is loaded.

Note, since we used acaddoc.lsp our routine will load every time a drawing is opened. If we only want our routine to load when AutoCAD is launched we would change the filename to acad.lsp.

I am not sure if there are other default filenames that behave similarly but the above two work great and should provide as much flexibility as you would need. This does not work for .dll files directly however, if you have a custom .dll you can just place a NETLOAD statement inside your custom acad.lsp or acaddoc.lsp. Remember, once you have an access point to load one routine, you can load as many other lisp routines, .dll files, .arx files, and more that you need.

This approach provides another streamlined method to load and manage custom content for multiple users.


Thursday, June 28, 2012

Simple Custom AutoCAD User Profile

In previous posts I have talked about creating AutoCAD user profiles and the different components that can be included in a profile. One of the main reasons to create an AutoCAD user profile is to have specific content available during an AutoCAD drawing session. This content can be anything from network and printer paths, to CAD standards, to custom commands.

This post will go through creating a very simple custom AutoCAD profile and hopefully it will make sense on how to add more information to the profile as needed in your environment.

An AutoCAD user profile has a lot of information in it and without being intimately familiar with it, it is difficult to know what each line in the profile (.arg) file is doing. The good news is it is really not that important if you just want to cut to the chase and create your own custom profile. We will let AutoCAD handle all the complicated stuff and we will focus on only the items we are concerned with (the simple stuff).

First, just a few high level points to make:
An .arg (AutoCAD Registry) file is used to create an AutoCAD user profile and set registry keys on your computer. If you have ever looked (you don't really need to) in your computer's registry you will see all of the AutoCAD user profiles that are defined on your computer. (Note: AutoCAD user profiles are specific to the logged in user).


After installing AutoCAD you should see the Unnamed Profile which is the out-of-the-box delivered AutoCAD user profile.

Let's create a new .arg file with the goal being to create a new AutoCAD user profile on our computer. To keep this simple we only need to think about the custom paths or content we want to add to our profile. In this case we are just going to add an AutoCAD Support Path and point to a custom cui file that we would like to have loaded as our Enterprise Menu File.

Rather than needing to account for all of the other settings in the profile we will let AutoCAD automatically assign everything else. So basically, only the registry keys that we want to override need to be identified in our new .arg file.

To accomplish the above we can create a new .arg file (either by exporting from AutoCAD, or from scratch). Once the .arg file exists we can clean out everything we do not need (so everything except for our support path and Enterprise Menu File). Whatever we do not define in our .arg file AutoCAD will create default registry keys for.

Here is the contents of our custom .arg file that adds a support path and an Enterprise Menu File: (You can edit an .arg file with Notepad)

REGEDIT4

[HKEY_CURRENT_USER\Software\Autodesk\AutoCAD\R18.1\ACAD-9001:409\Profiles\SLD_Example\General]
"ACAD"="C:\\SLD\\Support;%InstallFolder%\\support;%InstallFolder%\\fonts;%InstallFolder%\\help;%InstallFolder%\\express;%InstallFolder%\\support\\color;%RoamableRootFolder%\\support;"

[HKEY_CURRENT_USER\Software\Autodesk\AutoCAD\R18.1\ACAD-9001:409\Profiles\SLD_Example\General Configuration]
"EnterpriseMenuFile"="C:\SLD\Support\SLD_2011"

The path in between the brackets [ ] defines the location of the registry keys that we are modifying. Notice it is the same path as the registry location of the Unnamed Profile on our machine (above image) except for once we get to the Profiles location we are creating a new profile name, SLD_Example.
[HKEY_CURRENT_USER\Software\Autodesk\AutoCAD\R18.1\ACAD-9001:409\Profiles\SLD_Example\General]

We are overriding the "ACAD" registry key which is the AutoCAD Support Paths. The below support paths are copied from the Unnamed Profile and we added the 1 support path that we need for our custom profile.
"ACAD"="C:\\SLD\\Support;%InstallFolder%\\support;%InstallFolder%\\fonts;%InstallFolder%\\help;%InstallFolder%\\express;%InstallFolder%\\support\\color;%RoamableRootFolder%\\support;"

We then define the "EnterpriseMenuFile" registry key which is our custom cui file that we want our profile to have. (The cui file could be located in a network location so multiple users all receive the same custom content.)

"EnterpriseMenuFile"="C:\SLD\Support\SLD_2011"

Now when we point to this .arg file from our AutoCAD Desktop Shortcut and launch AutoCAD a new profile will be created on your computer:
Even though we only defined 2 registry keys you will notice that all of the other profile information is automatically defined by AutoCAD.

You now have a completely separate and custom AutoCAD user profile that contains all of the out-of-the-box AutoCAD settings with our additional custom content. This can be shared over a network and remember, once we load that Enterprise cui file we can gain access to custom content with an .mnl file that has the same name as the cui file.

I created a new Ribbon tab in this cui file so you can see that is available to us in our new profile:


This approach can offer a very streamlined method to manage multiple AutoCAD user profiles that maybe you have for each client. Only define the registry keys that you want to override (i.e. suport paths, cui file, maybe plot styles, etc.) and you can keep your profiles very simple and portable by letting AutoCAD do the rest of the work. This .arg file that we created can easily be upgraded to the next version of AutoCAD since we know AutoCAD will automatically define all of the other registry keys that we are not overriding. (Note, the registry path to the profile would be different for each version of AutoCAD - this it the path in the brackets [ ] mentioned above).

Note, you can build your profile in AutoCAD and export it out to get the .arg file. You can then remove any of the registry keys that you are not overriding and you will be left with your simple custom AutoCAD user profile.


Sunday, January 22, 2012

C#.Net: Use KeyWords To Provide Choices For Users

Let's add some keyword options to our circle MText program. The current version allows the user to enter a string to search for and then places a red circle around all matching MText entities in the drawing. To practice with the GetKeywords method we will let the user choose a different color for the circle from a list of choices.
Here is the C# code, note extended comments from previous versions have been removed.


using System;
using System.Collections.Generic;
using System.Linq;
using System.Text;

using Autodesk.AutoCAD.Runtime;
using Autodesk.AutoCAD.ApplicationServices;
using Autodesk.AutoCAD.DatabaseServices;
using Autodesk.AutoCAD.EditorInput;
using Autodesk.AutoCAD.Geometry;

namespace SLD_Demo
{
    public class MTextTools
    {
        [CommandMethod("SLDcirText")]
        public void SLDcirText()
        {
            //get current document
            Document acDoc =
                Application.DocumentManager.MdiActiveDocument;

            //get AutoCAD database
            Database acCurDb = acDoc.Database;

            //get string to search for
            String sldStrToSrch = SLDgetStringFromUser(acDoc);

            //get color of circle
            int sldCirColor = SLDgetColorFromUser(acDoc);

            //start db transaction
            using (Transaction acTrans =
                acCurDb.TransactionManager.StartTransaction())
            {
                //open block table
                BlockTable bt = (BlockTable)acTrans.GetObject
                    (acCurDb.BlockTableId, OpenMode.ForRead);

                BlockTableRecord btr = (BlockTableRecord)
                    acTrans.GetObject(bt[BlockTableRecord.ModelSpace],
                    OpenMode.ForRead);

                //iterate through block table to locate mtext objects
                foreach (ObjectId id in btr)
                {
                    //open each object to read
                    DBObject obj = acTrans.GetObject
                        (id, OpenMode.ForRead);

                    //only deal with MText objects
                    MText dbMText = obj as MText;

                    //if current object is Mtext
                    if (dbMText != null)
                    {
                        String curTxtValue = dbMText.Contents;
                        //and if the contents include the string entered
                        //by user 
                        if (string.Equals(sldStrToSrch, curTxtValue,
                            StringComparison.CurrentCultureIgnoreCase))
                        {
                            //draw a circle around the mtext entity
                            /*add an additional parameter from the last
                              version to pass the color index*/
                            SLDdrawCir(acCurDb, acTrans,
                                dbMText, sldCirColor);

                        }
                    }
                }
                //commit the transaction so we do not leave the db open
                acTrans.Commit();
            }
        }

        //function to get text string from user
        public String SLDgetStringFromUser(Document acDoc)
        {
            PromptStringOptions pStrOpts = new PromptStringOptions(
                "\nFind What: ");

            //control the prompt string options to behave like we want
            //such as allow spaces to be entered
            pStrOpts.AllowSpaces = true;

            //retrieve the string entered by user
            PromptResult pStrRes = acDoc.Editor.GetString(pStrOpts);

            //and assign to a new string variable
            String sldStr = pStrRes.StringResult;

            //return the string variable to calling function
            return sldStr;
        }

        /*function to get desired color from user. Gets preferred
          color entered as string, converts to int, and returns*/
        public int SLDgetColorFromUser(Document acDoc)
        {
            /*The GetKeywords method allows a selection to be presented
              to the user and requires a matching value to be entered.
              Error handling is already built in, if an invalid option
              is entered a message is displayed and the user is prompted
              again. Also, a matching value can be the first letter (not
              case sensitive) or some or all of a keyword. A default
              value can also be defined. The Message value is important
              too, this is the main message displayed along with the list
              of keywords.*/
            PromptKeywordOptions pKeyOpts = new PromptKeywordOptions("");
            pKeyOpts.Message = "\nSelect color of circle ";
            pKeyOpts.Keywords.Add("Red");
            pKeyOpts.Keywords.Add("Green");
            pKeyOpts.Keywords.Add("Yellow");
            pKeyOpts.Keywords.Add("Blue");
            pKeyOpts.Keywords.Default = "Red";

            //call GetKeywords and pass in our options
            PromptResult pKeyRes = acDoc.Editor.GetKeywords(pKeyOpts);

            //create int value to store color index (default to red)
            int sldCirColor = 1;

            /*switch statement to convert the color string
              to a color index value*/
            switch (pKeyRes.StringResult)
            {
                case "Green":
                    sldCirColor = 3;
                    break;
                case "Yellow":
                    sldCirColor = 2;
                    break;
                case "Blue":
                    sldCirColor = 5;
                    break;
            }

            return sldCirColor;
        }

        //function to draw circle around an MText object
        public void SLDdrawCir(Database acCurDb,
            Transaction acTrans, MText MtextObj,
            int cirColor)
        {
            //define a new point object for the center point of circle
            Point3d cenPoint = new Point3d();

            //use the location method of the Mtext object to define
            //the center point coordinates
            cenPoint = MtextObj.Location;

            //define a new Circle object
            Circle textCir = new Circle();
            textCir.Center = cenPoint;
            textCir.Diameter = 1.0;
            //assign color index the value entered by user
            textCir.ColorIndex = cirColor;

            //now add the circle to the drawing (model space)
            BlockTable acBlkTbl;
            acBlkTbl = acTrans.GetObject(
                acCurDb.BlockTableId, OpenMode.ForRead) as BlockTable;

            BlockTableRecord acBlkTblRec;
            acBlkTblRec = acTrans.GetObject(
                acBlkTbl[BlockTableRecord.ModelSpace],
                OpenMode.ForWrite)
                as BlockTableRecord;

            acBlkTblRec.AppendEntity(textCir);
            acTrans.AddNewlyCreatedDBObject(textCir, true);
        }
    }
}

To test, NETLOAD the .dll into AutoCAD and place some MText entities. Try entering an invalid keyword. Also, test out entering just the first letter of a keyword, the first few letters, or the entire string. It all works!